Forum Replies Created
list of topics you have created till now.
-
-
You can find it in your single-portfolio.php file (Appearance > Editor > single-portfolio.php).
You are welcome!
Edited:
body.blog .featured-image img { max-height: 50%; width: auto; }Hi, use this in your custom css field:
.featured-image img
{
max-height: 50%;
width: auto;
}
Thanks
Hi, you can change your blog layout from Theme Options > Blog > Blog Type.
Thanks
Hi, use this in your custom css field:
.featured-image img
{
-webkit-transition: all 0.3s ease-out;
-moz-transition: all 0.3s ease-out;
-o-transition: all 0.3s ease-out;
transition: all 0.3s ease-out;
}

.featured-image img:hover
{
opacity: 0.7;
filter: alpha(opacity=70);
}
Thanks
Mehmet S.
Keymaster15 November 2013 at 22:35Posted in : Removing "posted in…Date… comments" on all pagesHi, use this in your custom css field:
.post-category,
.comments-link { display: none; }
Thanks
The new version is available! You can download it from ThemeForest.
Thanks
You are welcome!
Keymaster14 November 2013 at 14:43Posted in : Delete Comments / Post Formats Standard / jsYou are welcome!
Hi,
1 – Exclude Categories (From The Blog):
– go to Appearance > Editor > functions.php.
– find this line:
$args_recent_posts = array( 'post_type' => 'post', 'posts_per_page' => $number_of_posts_to_show );
– edit:
$args_recent_posts = array( 'post_type' => 'post', 'posts_per_page' => $number_of_posts_to_show, 'cat=-12,-34,-56' );
2 – Exclude Categories (Blog page):
– go to Appearance > Editor > index.php.
– find this:
<?php
if ( have_posts() ) :
– edit:
<?php
query_posts( 'cat=-1,-2,-3' );
if ( have_posts() ) :
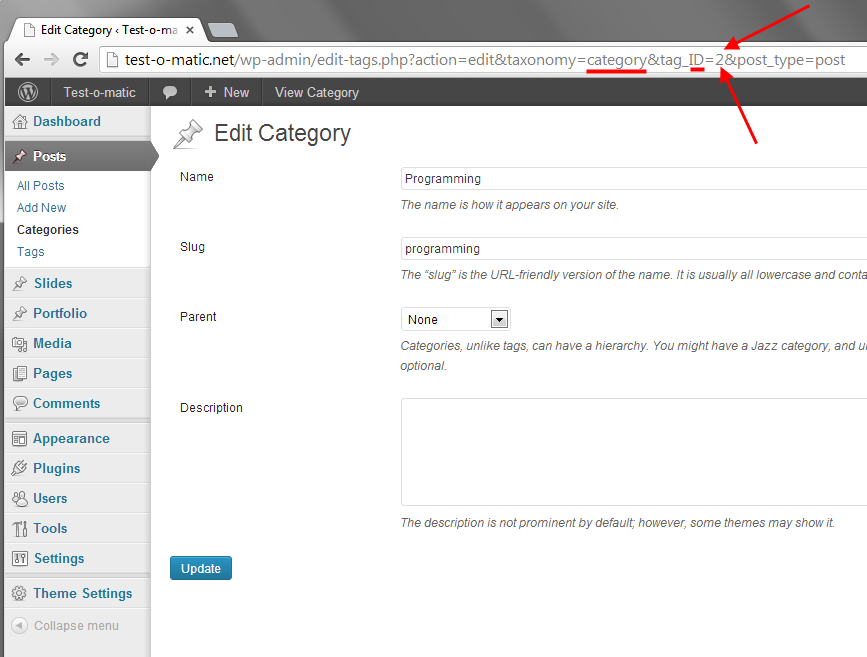
Note: The numbers are category ids. You can find a category id in your edit screen.
See in the image:
You are not using the built-in portfolio functionality. Please check the “Portfolio” section in the theme’s documentation. You can download it from ThemeForest.
Sorry, I’m not exactly sure what you’re asking?
Keymaster14 November 2013 at 03:31Posted in : Delete Comments / Post Formats Standard / jsEvery post/page has a “Quick Edit” link when you hover in the editing list. Click it to open “QUICK EDIT” menu, then uncheck the “Allow Comments” option to hide the form at the bottom of a page.
You are welcome!
Here is:
[drop_caps]
some stuff here
[/drop_caps]
Thanks
You are welcome!
@andreeam: You can use this in your custom css field to hide that text without selecting any extra style option.
.media-box .mask .title { display: none; }Thanks
You are welcome!
You are welcome!
Ok. Good luck.
Hi, select the post name option under your permalink settings.
Thanks
Keymaster13 November 2013 at 22:45Posted in : Large Space After Blockquote / Cite shortcodeYou are welcome!
It is important to access the page content or just title. You should assign a page (new or old) under “Portfolio Page” option to say to the theme to show in the middle section.
Note: Don’t delete anything.
Note 2: I mean about the “important” keyword, it is important, because if you don’t select any page under the “Portfolio Page” option, then you will not have a page title in the middle section of your bookcard.
You did it. Now I see your portfolio. Good luck!
Keymaster13 November 2013 at 22:21Posted in : Large Space After Blockquote / Cite shortcodeTry this one:
blockquote { padding-bottom: 0px; }Sorry, I didn’t see any difference.
Keymaster13 November 2013 at 21:50Posted in : Large Space After Blockquote / Cite shortcodeHi, use this in your custom css field:
blockquote { margin-bottom: 0px; }Thanks
Firstly, update the theme to the latest version. You can download it from ThemeForest. Secondly, check your input fields under Theme Options.
I see a JPG format image is used. It is not comfortable for all major browsers. Choose ICO, PNG or GIF image. ICO is recommended. You can use this free software to create one.
Did you change the color value in the code? I gave the original color.
The code above applies to all pages. If you want to apply only 1 page, add page/post id to the code:
Example (page):
body.page-id-7
{
background-image: url("paste-your-image-file-url-here");
backgroud-repeat: no-repeat;
}
Example (post):
body.postid-62
{
background-image: url("paste-your-image-file-url-here");
backgroud-repeat: no-repeat;
}
The numbers are ids. You can find a page/post id in your edit screen after publishing.
Hi, use this in your custom css field:
.main-navigation { background: #333838; }Thanks
‘Food’ on the Categories.
Ok. Good luck!
You are welcome!
@5neak: Please see my last message here http://www.pixelwars.org/forums/topic/version-4-5-contact-form-not-working/#post-9948
Thanks
Hi everyone, please see my last message at this post http://www.pixelwars.org/forums/topic/version-4-5-contact-form-not-working/#post-9948
Thanks
@mrbake: Please see this post http://www.pixelwars.org/forums/topic/version-4-5-contact-form-not-working/#post-9948
I will try to improve the contact form. At this time, you can use the Contact Form 7 plugin for a temporarily solution. If you want to use the SMTP way to send mails, then use additionally a smtp plugin listed below:
WP Mail SMTP: http://wordpress.org/plugins/wp-mail-smtp
Easy WP SMTP: http://wordpress.org/plugins/easy-wp-smtp
WP SMTP: http://wordpress.org/plugins/wp-smtp
Configure SMTP: http://wordpress.org/plugins/configure-smtp
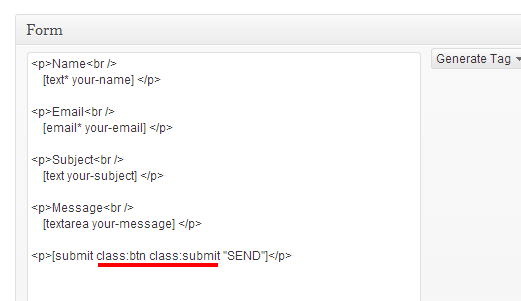
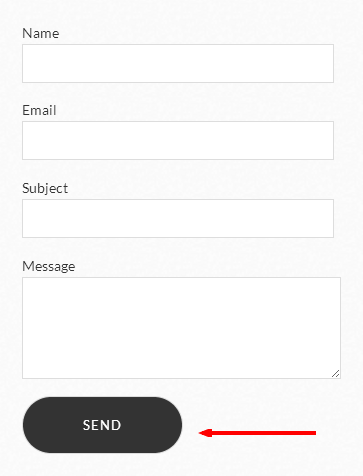
– If you want to see the same submit button style, then edit the contact form 7:
<p>Name<br />
    [text* your-name] </p>

<p>Email<br />
    [email* your-email] </p>

<p>Subject<br />
    [text your-subject] </p>

<p>Message<br />
    [textarea your-message] </p>

<p>[submit class:btn class:submit "SEND"]</p>
See in the images:
Please set featured image for your portfolio items.
Hi, use this in your custom css field:
hgroup { display: none; }Thanks
You are welcome!
You are welcome!
You are welcome!
– The contact page template improved. So you need to re-select it for a once.
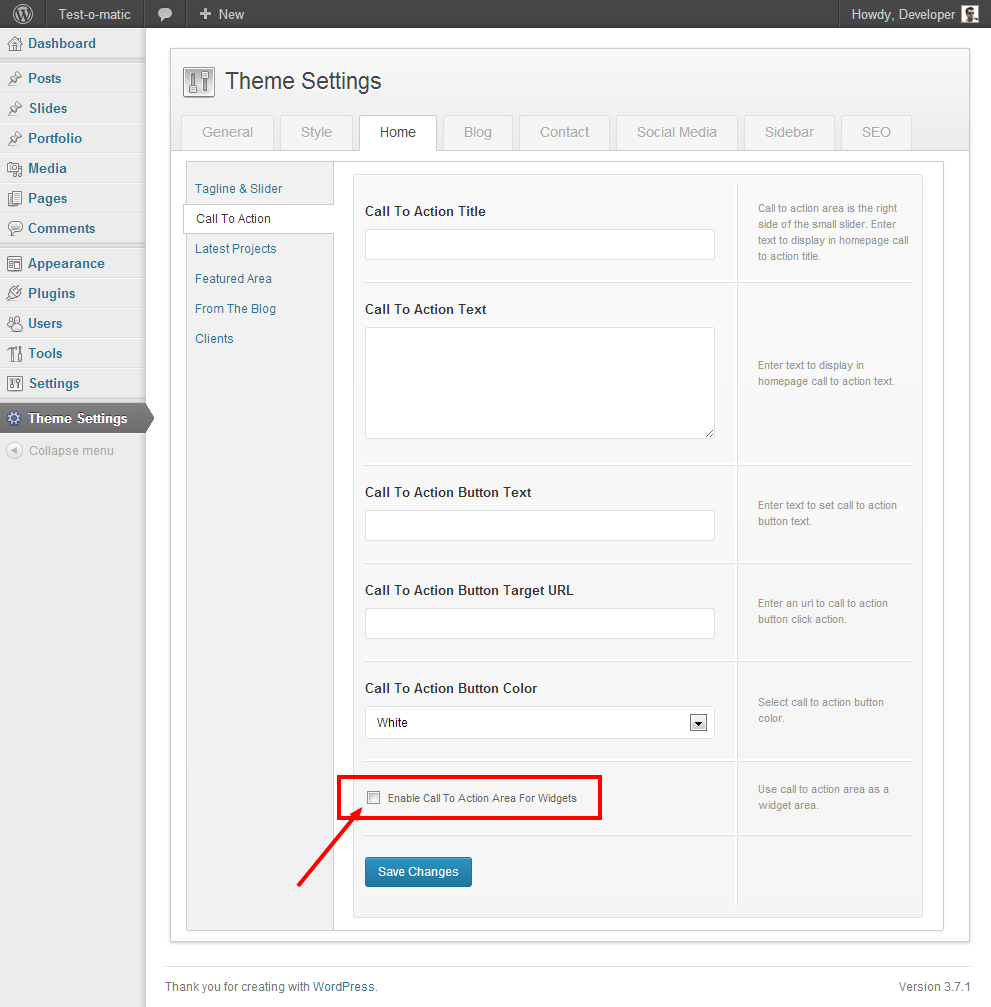
– There is checkbox in the Call To Action settings page. Don’t check it. Because it converts the CTA to a widget location.
See in the image:
Which items?
– Please go to Theme Settings > Home > Call To Action and fill the fields then save the changes.
Paste to Theme Options > Style > External JS:
<script> jQuery(document).ready(function($) { $('#primary.span7').removeClass('span7').addClass('span8'); $('#secondary.span5').removeClass('span5').addClass('span4'); }); </script>Ok. Good luck.
Hi, use this in your custom css field:
.form-allowed-tags { display: none; }Thanks